Absinthe Fountain Maintenance & Repair
Absinthe Fountain
Maintenance, Repair & Spigot Replacement
Maintenance
& Repair
With proper
maintenance, your
fountain will last many lifetimes. How often you need to perform
maintenance depends on how often the fountain is used. You can reduce
maintenance by not leaving water in your fountain for extended periods.
It is best to empty and dry your fountain after each use. You can also
repair
a leaking fountain by following the instructions below
.
Need Parts? Contact us. We have most repair parts in stock.
1.) Spigot Removal
& Re-Installation
A. Identifying Your Spigot Style
There are
3 basic types of spigot valves that are
identical except for how the spigot insert is held in place. After
identifying your spigot, remove retainers and move on to
Part
B - Cleaning & Lubricating
.
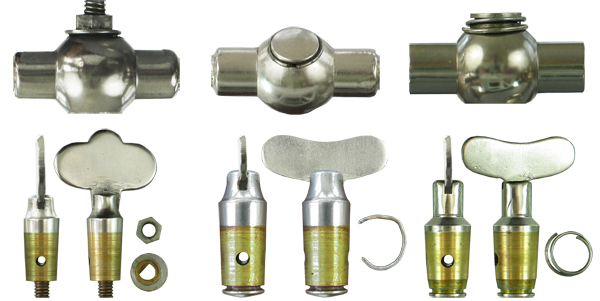
Type 1 has a small nut (1/4 or 15/64) and washer on
the bottom. Remove washer and nut minding which side of each faces the
spigot so they can be re-installed
the
same way. After re-installation, tighten nut more or less to adjust
water flow.
Type 2 has a c-clip mount. Remove c-clip by popping
it out with small tipped screw driver, pin or tweezers. The clip is
soft and will easily bend. Try not to distort
the
clip more than needed for removal to simplify re-installation. To
re-install, put clip into channel on insert and squeeze into place. If
a portion of the clip is still
sticking
out, hold clip in place while pushing on the extended portion with your
screw driver, pin or tweezers.
Type 3 has a spring
mount. Remove spring by pushing it into channel on one side while
pulling off other side of spring with your fingernail. To
re-install, put 1 side of the spring into channel
of insert and pull other side over bottom of spigot and snap into place.
B. Cleaning & Lubricating
Before We Begin
It is best to work on one spigot at a
time
as inserts should be re-installed in the spigot socket from which
it was removed. As the fountain ages, the
spigot
key/insert
becomes closely
matched with the
socket. After your first cleaning,
it will actually be a better fit than when it was new.
If you
plan to remove all spigots at one time,
mark each spigot key/insert and
the spigot it was removed from with something that is easily wiped off.
After removing spigot retainer. Tap lightly on bottom of spigot to
remove insert. Clean insert with non-abrasive, non-toxic cleaner.
NEVER
use abrasive cleaners as they will “scar” the insert and cause leaking. Clean the socket of the spigot
the same way. Use special care to avoid getting debris in the holes of
the insert or socket. You can clean the
holes
with a small wire if needed. *Once spigot insert and seat are smooth
and clean, apply a thin coat of a non-toxic lubricant. Vaseline,
lanolin or food grade
lubricant
work best. Reassemble spigot.
*Note: You can also blow into the open spigot valve, once reassembled,
to clear debris.
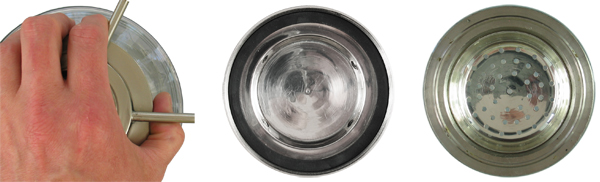
2.) Spigot
Assembly Removal
Normally you will not remove the spigot assembly (removable base at
bottom of bowl). If water starts leaking from the area between the bowl
and spigots, assembly should be removed and reset. You will need
someone with strong hands. Wear thick gloves in the event the glass
breaks to avoid injury. After removing bowl from pedestal, place one
hand over spigot assembly and grip tightly (See Below).
DO NOT
put pressure on the spigots. With your other hand, grip the bowl with
your thumb on the outside of the bowl and your four fingers inside the
bowl. Turn base counter clockwise.
After removing glass bowl, remove gasket and clean
all metal surfaces, including threads, with non-abrasive cleaner. Also
clean gasket with warm soapy water. Apply a thin coating of Vaseline,
lanolin or food grade lubricant to gasket and threads on bowl.
Reassemble making sure gasket is centered and seated properly. Gasket
in picture (below center) is seated properly. Note: Spigots have been removed. If your
gasket is smaller than shown, hold spigot base level while attaching
bowl so gasket does not shift. Or, place bowl upside down and position
gasket on bowl then attach spigot assembly.
*Lubricant will help hold
gasket in place. Last image shows mating
surface on bottom of bowl for spigot assembly. Hand tighten only.
If you have any questions concerning your fountain please contact us.
Phone 860-997-5063, [email protected],
AbsintheOnTheNet.com
|